This tutorial covers the complete equipment management system in Rank One Pro, including setting up categories, managing sizes, tracking inventory, and checking equipment in and out to athletes by roster.
Categories allow administrative users to track equipment throughout the entire district. Categories are unique for each school district and can only be added by the Athletic Director login. You are not required to enter or use categories.
When logged in as the Athletic Director, hover over the Equipment tab and select Sports Equipment. You will be taken to the "Manage Sports Equipment" page.
On the Manage Sports Equipment page, click the Equipment Categories button.
Click the Add Category button.
Type in a Category Name.
Select a Size Template if the item has different sizes.
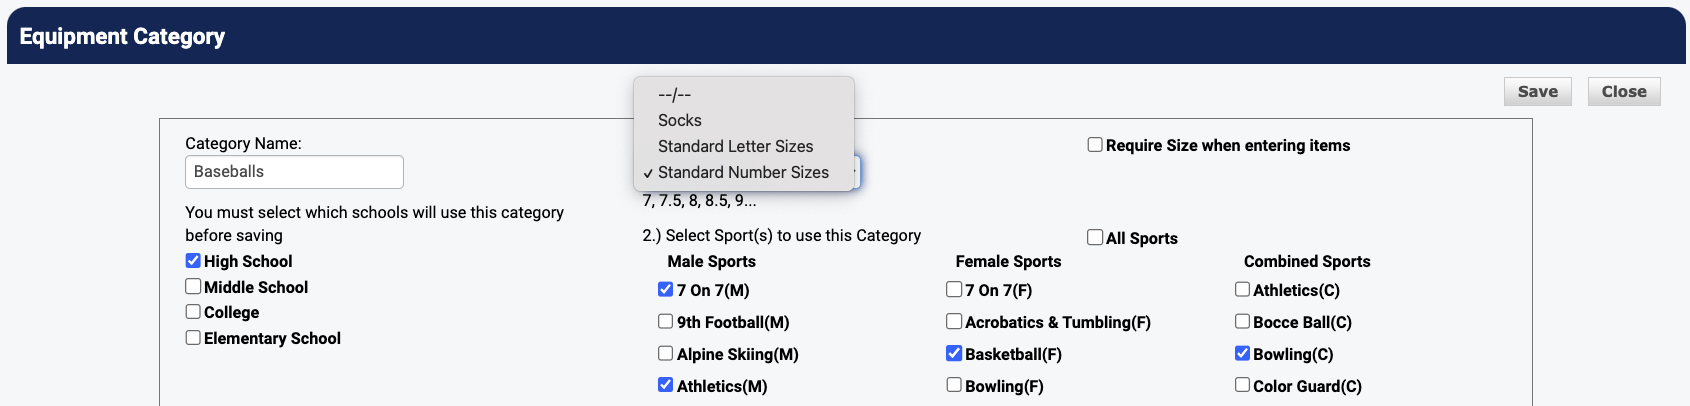
The Equipment Category page with the Size Template dropdown menu
Select High School, Middle School, or both for the "Schools to use this Category":
Select the appropriate Sport(s) that the category being entered applies to. When the sport is selected, the category will be an option to select from when equipment is being entered for the specified sport. If a sport is not selected, the category will not show up for selection when entering equipment.
Click Save.
If equipment items have previously been entered into Rank One, they can still be assigned a category with the following steps:
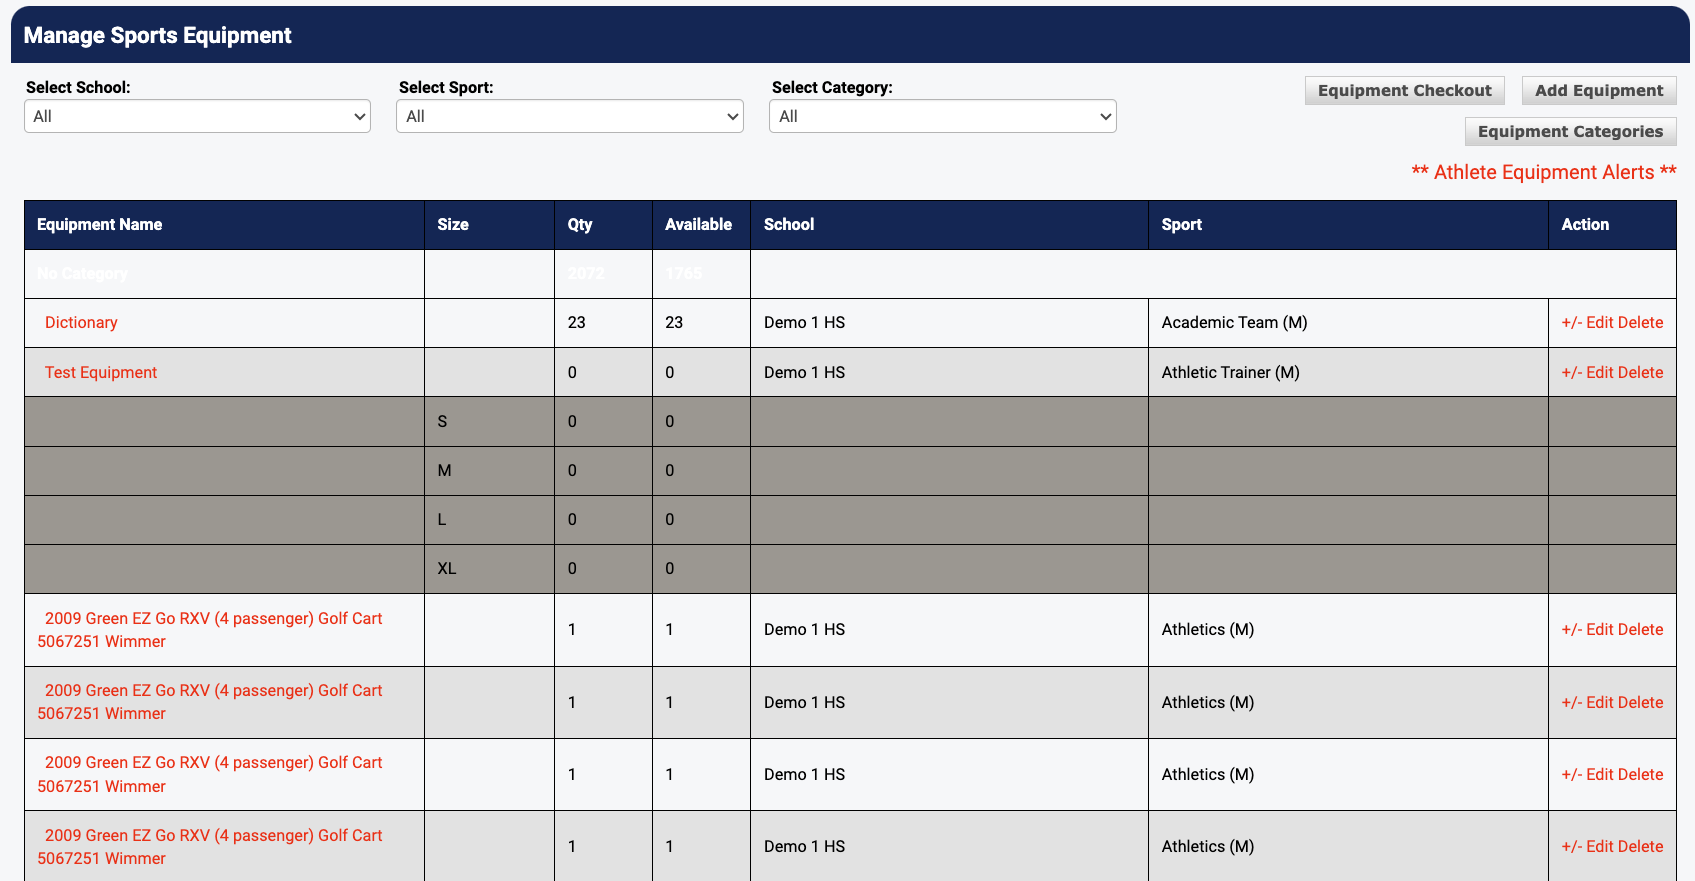
Find the item you would like to assign a category to. It will be listed under the "No Category" heading if it has not previously been assigned. Click the Edit link on the item's row.
The Manage Sports Equipment page showing equipment items and Edit links
Before selecting a Category, take note of the number in the Total Quantity box. This number will be set to 0 when you assign a category. You will want to know what the total quantity number was in order to match it up after assigning the category.
The Equipment Detail page -- note the Total Quantity before assigning a category
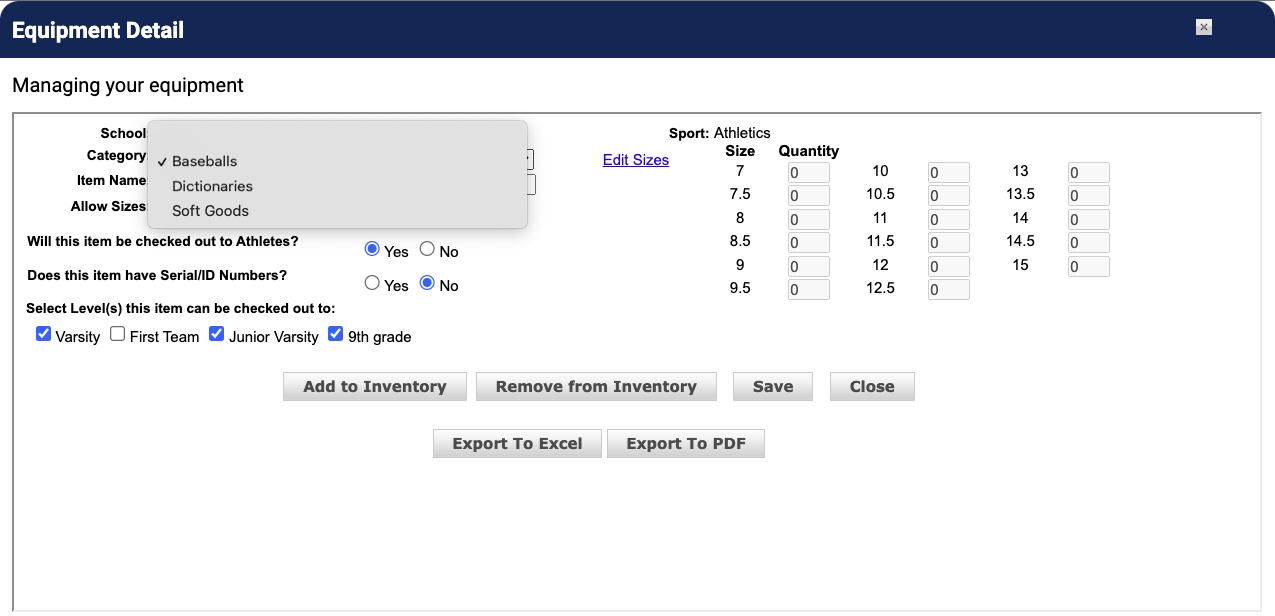
Select the desired category to be assigned to the item you are working on.
Selecting a category from the dropdown menu
The Total Quantity for the item will be set to zero. Next, click the Add to Inventory button to enter the quantity of the item.
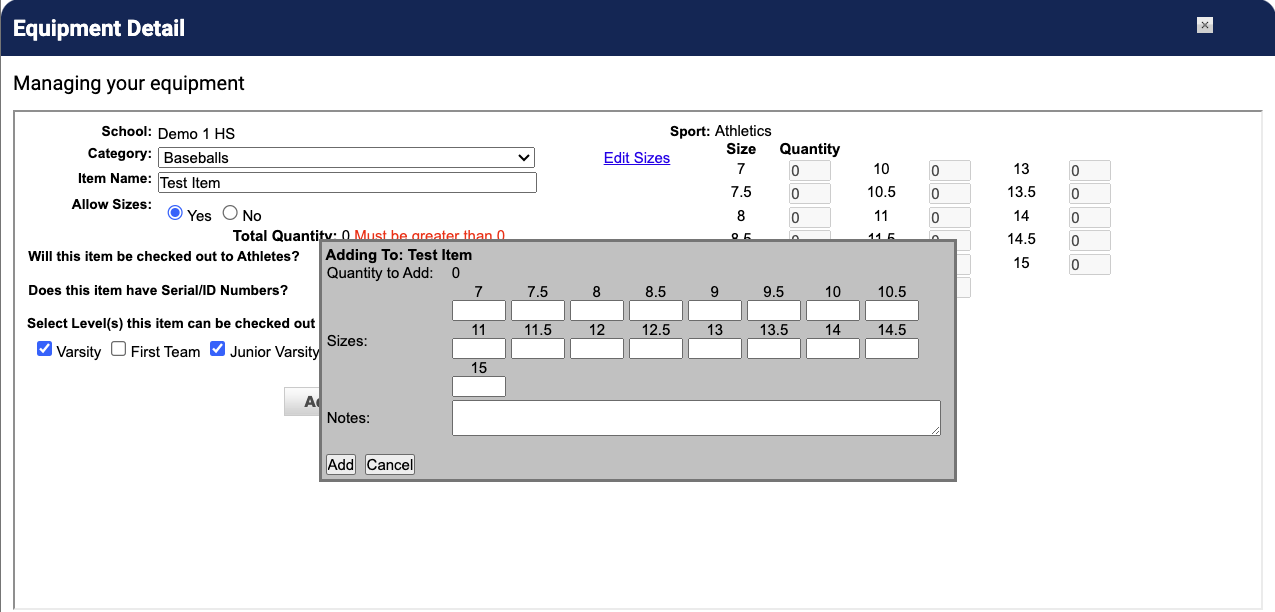
If the item is broken down by sizes, enter the quantity of each size. If the item is not broken down by size, enter the total quantity of that item. Enter a note to explain that the Addition to Inventory was to assign a Category to a previously entered item. Click Add.
The Add to Inventory dialog with size quantities and a notes field
Click Save. The item will now be sorted under the selected category.
Size templates can be used to provide a built-in starting point when entering sizes of equipment items. Size templates are assigned by category and can only be assigned by the Athletic Director login.
When logged in as Athletic Director, hover over the Equipment tab and select Sports Equipment.
Click the Equipment Categories button.
Click Add Category or the Edit link on the appropriate Category row.
On the Equipment Category page, select the desired size template from the drop-down menu.
Selecting a size template from the dropdown on the Equipment Category page
After you have selected a size template, you will see a preview of the sizes that will be available when using that template.
After entering the remaining details for the category, click Save. Sizes can be entered for equipment that was previously entered in Rank One and/or sizes can be assigned to equipment being entered for the first time.
Hover over the Equipment tab and select Sports Equipment or Medical Equipment depending on the item you would like to add.
Click the Add Equipment button.
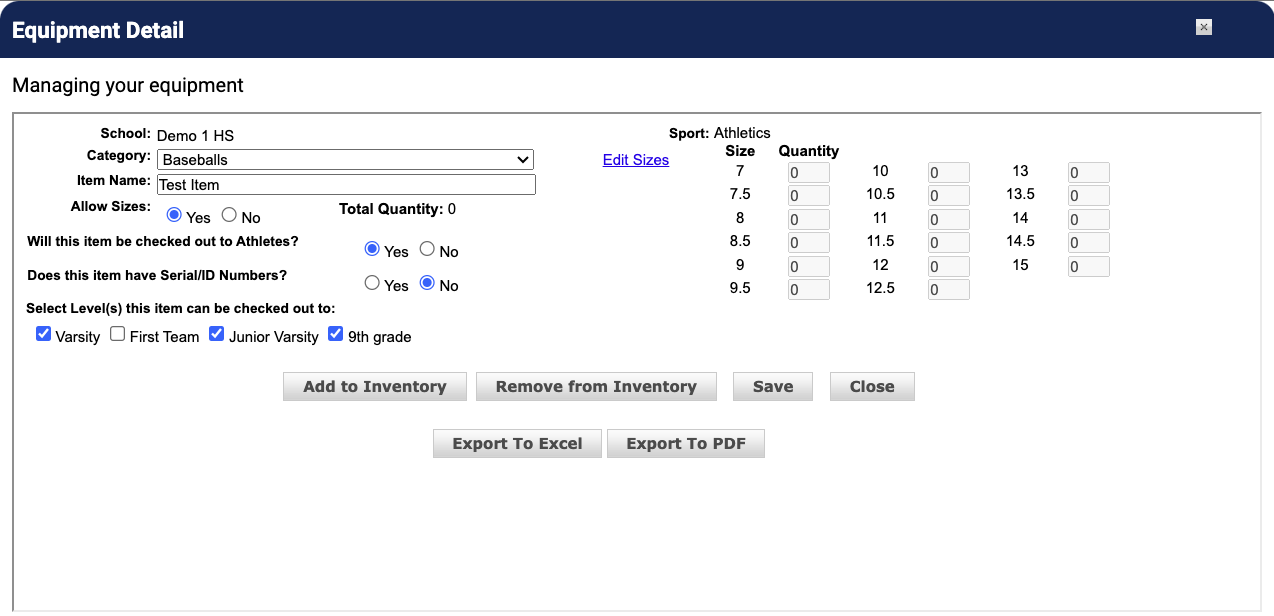
On the Equipment Detail page, select the appropriate Category for the item being entered. If the category selected has been assigned a size template, this will be populated to the right. If a template has not been assigned, sizes will need to be added individually (see Step 5).

Equipment Detail page showing sizes populated from a size template
To edit the list of sizes displayed and/or available, click the Edit Sizes link.
Only those sizes that have a check mark next to them will be displayed. To hide sizes, un-check the box on that line. To add sizes not yet displayed, enter the desired size into the text box at the bottom of the window and click the Add link.
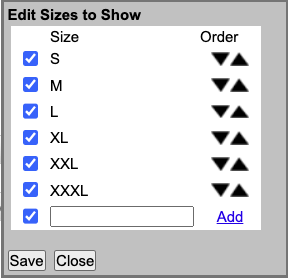
The Edit Sizes dialog allows you to show, hide, reorder, and add sizes
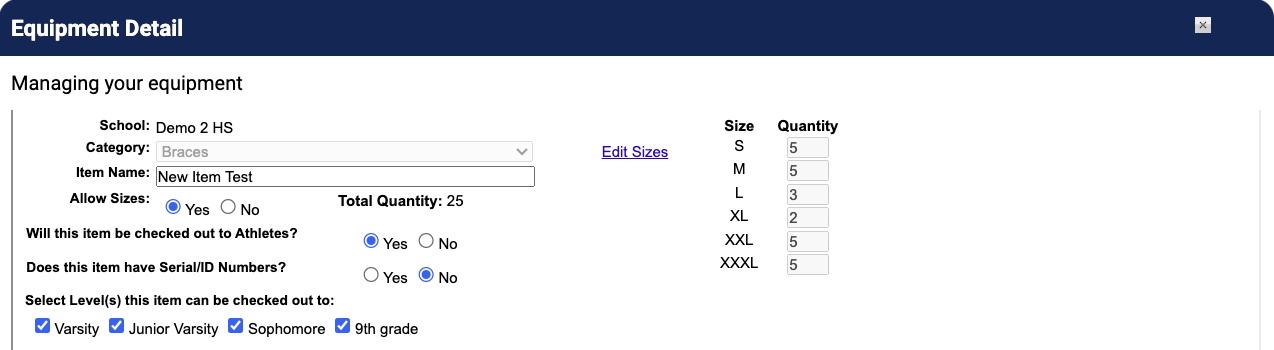
After setting up the size list, simply enter the quantity of each size in the appropriate text box. The total quantity will automatically be calculated for you.
Size quantities entered with the Total Quantity automatically calculated
After all sizes have been entered, click Save to return to the Equipment list or Save & Add to enter additional items.
Hover over the Equipment tab and select Sports Equipment or Medical Equipment depending on the item you would like to edit.
Click the +/- Edit link on the row for the item you would like to assign sizes to.
On the Equipment Detail page, select the appropriate Category for the item being entered. If the category selected has been assigned a size template, this will be populated to the right. If a template has not been assigned, sizes will need to be added individually (see Step 5).

Equipment Detail page showing sizes for an existing equipment item
To edit the list of sizes displayed and/or available, click the Edit Sizes link.
Only those sizes that have a check mark next to them will be displayed. To hide sizes, un-check the box on that line. To add sizes not yet displayed, enter the desired size into the text box at the bottom of the window and click the Add link.
Once the size list is set up, enter the items according to size by clicking the Add to Inventory button. Enter the quantity of each size in the appropriate space (Total quantity will be calculated automatically), and then type in an explanation of the equipment addition in the Notes box. Click Add.
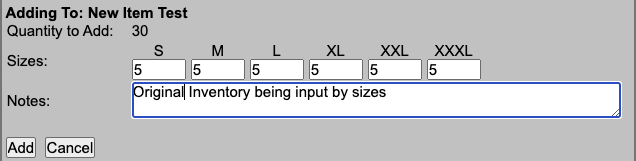
Adding inventory by size with a note explaining the addition
Click Save.
On the Manage Sports Equipment page, select the appropriate School and Sport for the equipment being entered, then click Add Equipment.

The Manage Sports Equipment page with school and sport selectors
If you are using Categories to sort items, select the appropriate category for the item being entered. You may skip this step if Categories are not being used.

Selecting a category from the dropdown list
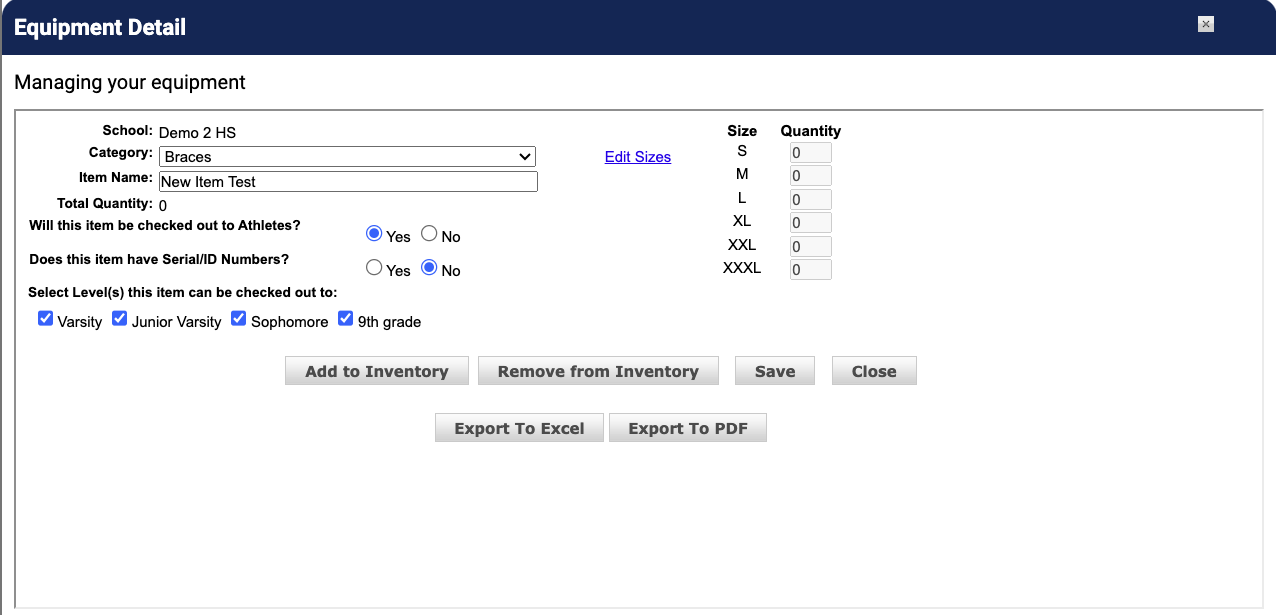
Type in the Name of the item being entered.
Select Yes or No for Allow Sizes.
If you selected Yes for "Allow Sizes," enter the quantity of each size in the spaces available. The Total Quantity will be calculated based on what is entered for each size. You can also control the Sizes displayed by clicking the Edit Sizes link.
Enter the quantity for each size -- Total Quantity is calculated automatically
Will this item be checked out to Athletes? If the item being entered will be checked out to athletes, select Yes and the item will appear on the check out screen.
Does this item have Serial/ID Numbers? Selecting Yes will allow you to assign an identifying number to the piece of equipment when it is checked out to an athlete. If identifying numbers are not necessary, select No.
Select Level(s) this item can be checked out to. Selecting the levels will control if the item being entered will show up during the checkout process. Check-Out/Check-In is performed according to Rosters, so specifying levels for items will make the Check-Out/Check-In process much quicker.
After you are satisfied with the details entered, click Save & Add to enter additional items or Save to return to the Equipment screen.
If you are receiving additional or removing items that you have previously entered into Rank One, follow these steps:
From the Manage Sports Equipment page, find the appropriate item you would like to add inventory for and click the +/- Edit link.
Click the +/- Edit link on the appropriate item row
Click the Add to Inventory button.
The Equipment Detail page with the Add to Inventory button
If the item involves sizes, enter the individual size quantities or the total quantity to add.
Adding inventory with sizes -- enter the quantity for each size
If there are no sizes associated with the item being added, enter the number of additional items in the Quantity to Add box.
Adding inventory without sizes -- enter the total quantity to add
Type in a Note explaining the addition. This note may be something such as the Purchase Order Number.
Click Add.
The items will be added to your existing inventory and noted on the Equipment Details screen.
From the Manage Sports Equipment page, find the appropriate item you would like to remove inventory for and click the +/- Edit link.
On the Equipment Detail page, click the Remove From Inventory button.
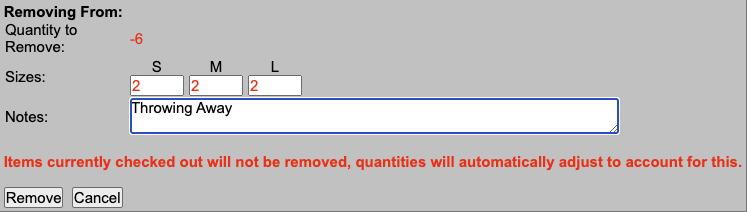
If the item involves sizes, enter the individual size quantities to remove.
If no sizes are associated with the item being removed, enter the number being removed in the Quantity to Remove box.
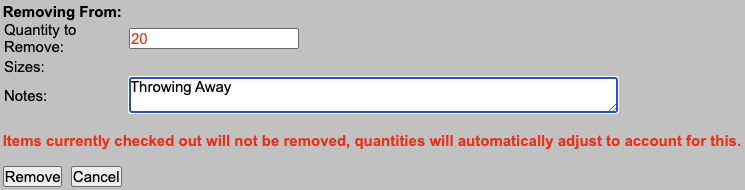
The Remove From Inventory dialog with quantity and notes fields
Click Remove.
The appropriate number of items will be removed from the Total Quantity of the item and noted on the Equipment Detail page.
Checkout and Check-In can be performed according to your rosters. Before beginning the Checkout process, please make sure you have your equipment entered into Rank One and the Roster(s) built.
Hover over the Equipment tab and select Sports Equipment. Then click the Equipment Checkout button.
The Equipment Checkout button on the Manage Sports Equipment page
Alternatively, hover over Student Management and select Manage Rosters. Then click the Equipment Checkout button.

The Equipment Checkout button on the Manage Rosters page
On the Manage Equipment page, the items available for checkout are listed across the top and the roster is on the left side.
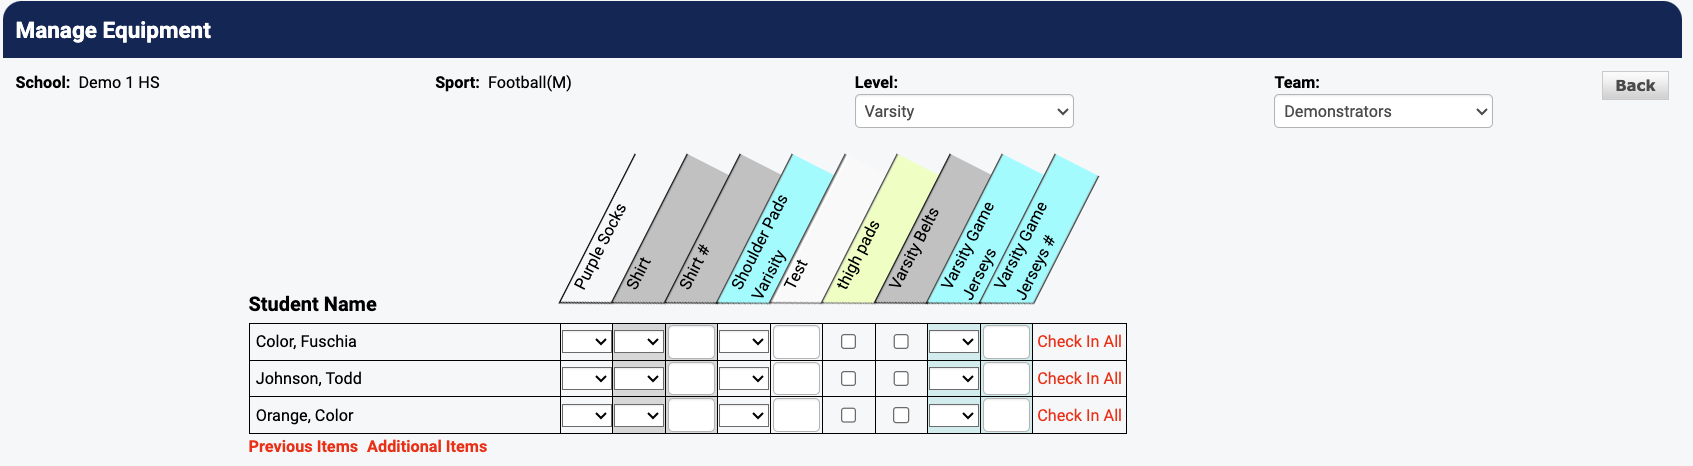
The Equipment Checkout screen showing items and the roster
There are four scenarios for checking out an item, each with a slightly different method for checking out and checking in.
Items like this will be displayed with a checkbox in the column.
Click the checkbox in the appropriate column. When you do so, a "Saved!" message will appear on that student's row and the item will be assigned to his or her profile.
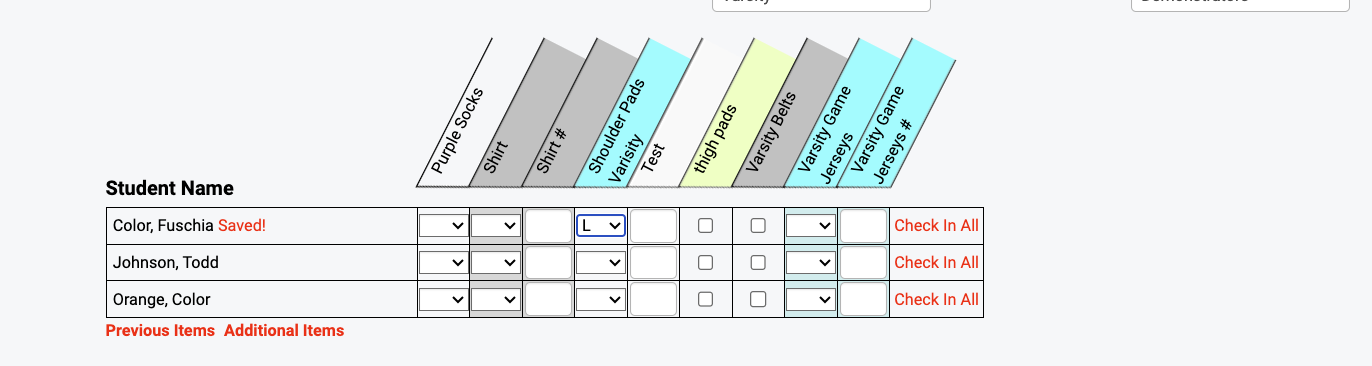
Checking out an item using a checkbox -- "Saved!" confirms the action
Click the checkbox to remove the check mark in the appropriate space. When you do so, a "Saved!" message will appear on that student's row. The item will be removed from the student's profile and placed back in inventory.

Checking in an item by unchecking the checkbox
These items will have a drop-down menu in the column.
Click on the drop-down menu, highlight the appropriate size to be checked out, and click on that size.
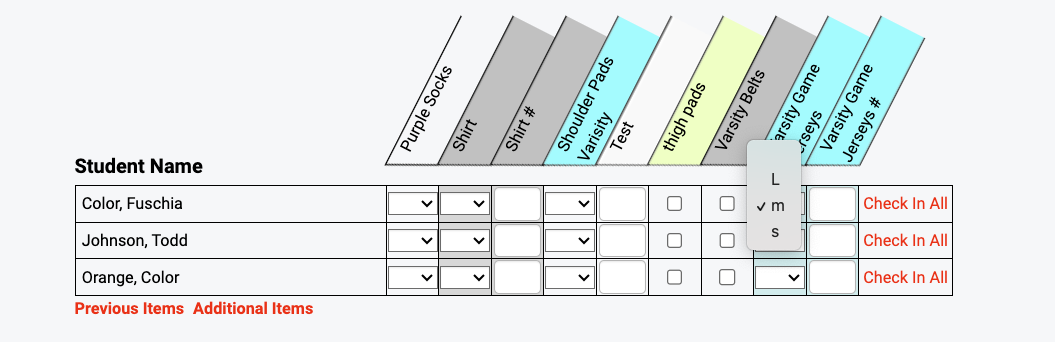
Selecting a size from the dropdown to check out the item
When you do so, a "Saved!" message will appear on that student's row. The item will be assigned to that student's profile and removed from inventory.

The "Saved!" message confirms the size was checked out
Click on the drop-down in the appropriate space for the student and item being checked in. At the top of the drop-down will be a blank space. Click on the empty space.
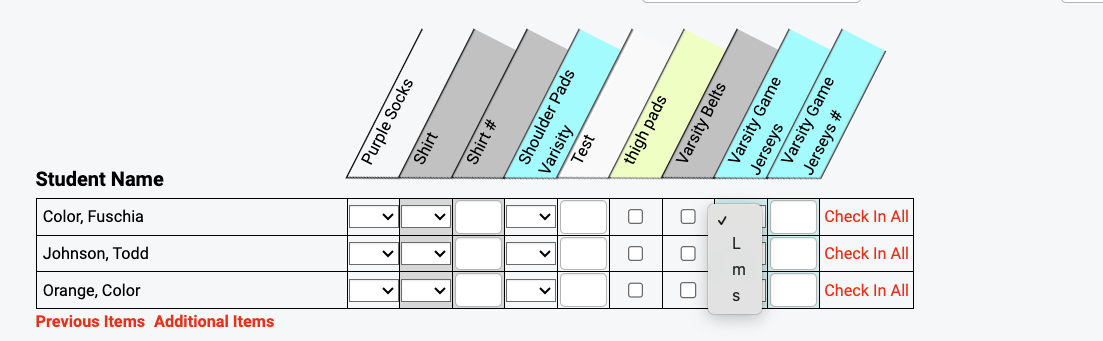
Select the blank space at the top of the dropdown to check in the item
After clicking the blank space, a "Saved!" message will appear on that student's row. The item will be removed from the student's profile and returned to inventory.

The "Saved!" message confirms the item was checked in
These items will have a blank text box in the column.
Find the appropriate text box on the row for the student you are checking out the item to and in the column for the item. Enter the Identification Number for the item to be checked out, then press Tab on your keyboard or click anywhere outside of the text box.
Enter the ID number in the text box to check out the item
You will know the item has been checked out when the "Saved!" message appears on the appropriate student's row. The item will be assigned to the student and removed from inventory.
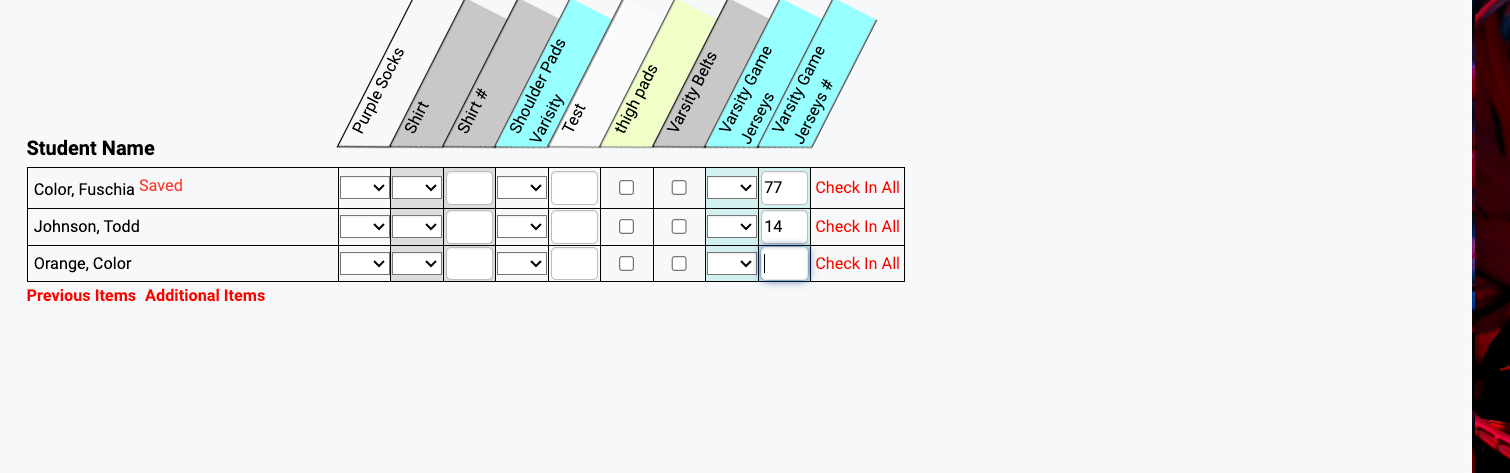
The "Saved!" message confirms the item was checked out with an ID number
Find the appropriate text box on the student row and item column you would like to check in. Click in the text box and completely delete the ID number that was previously entered. Hit the Tab key on your keyboard or click anywhere outside of that text box.
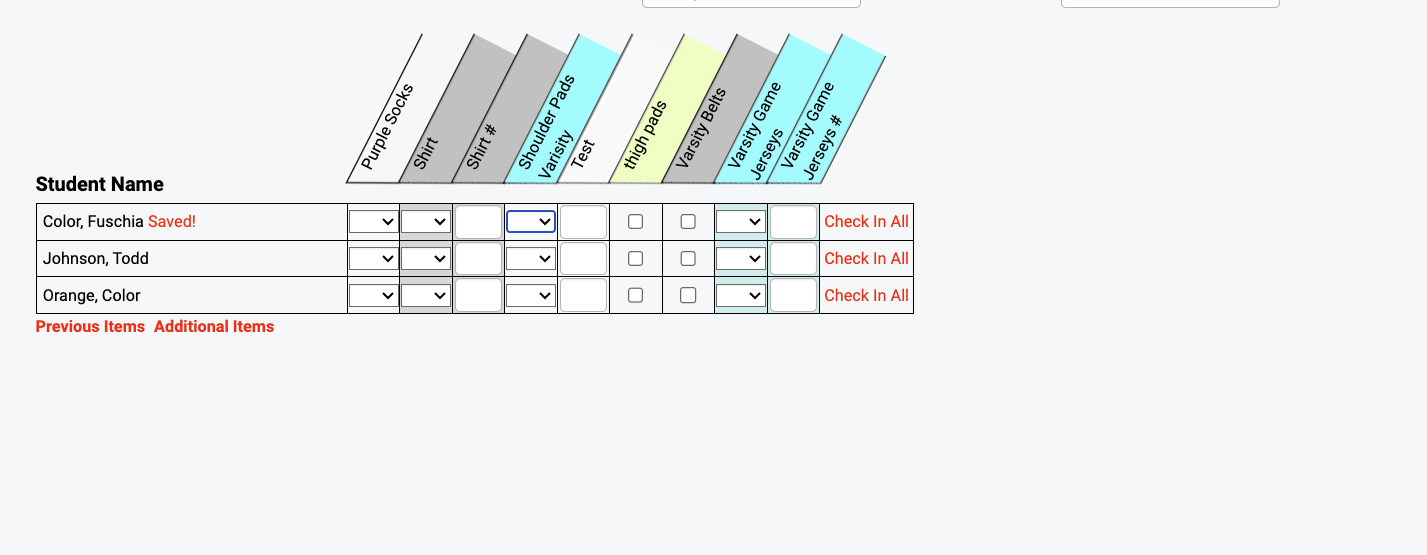
Delete the ID number and press Tab to check in the item
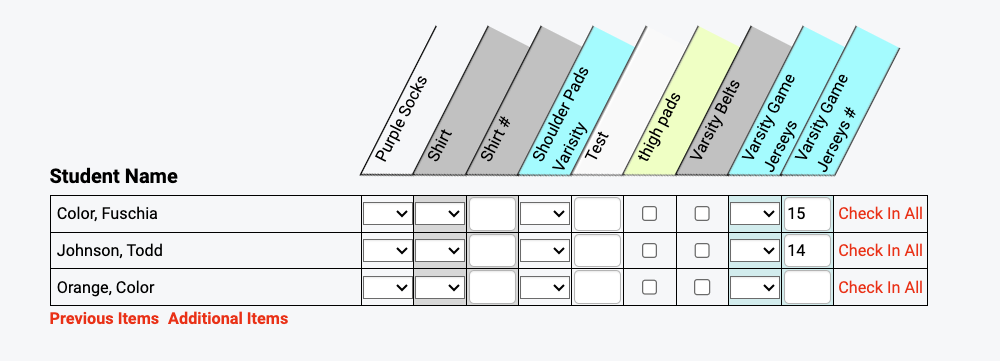
These items will have both a size drop-down and an ID text box.
Click on the drop-down menu, highlight the appropriate size to be checked out and click on that size. Enter the Identification Number for the item to be checked out, then press Tab on your keyboard or click anywhere outside of the text box.
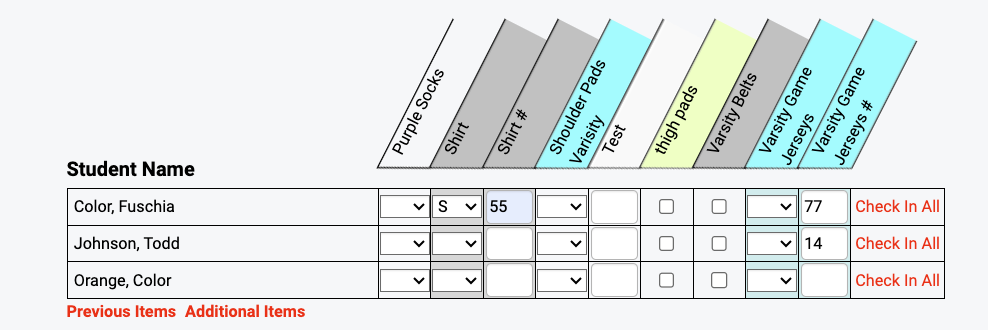
Select a size and enter an ID number for checkout
You will know the item has been checked out when you see the "Saved!" message on the student's row.
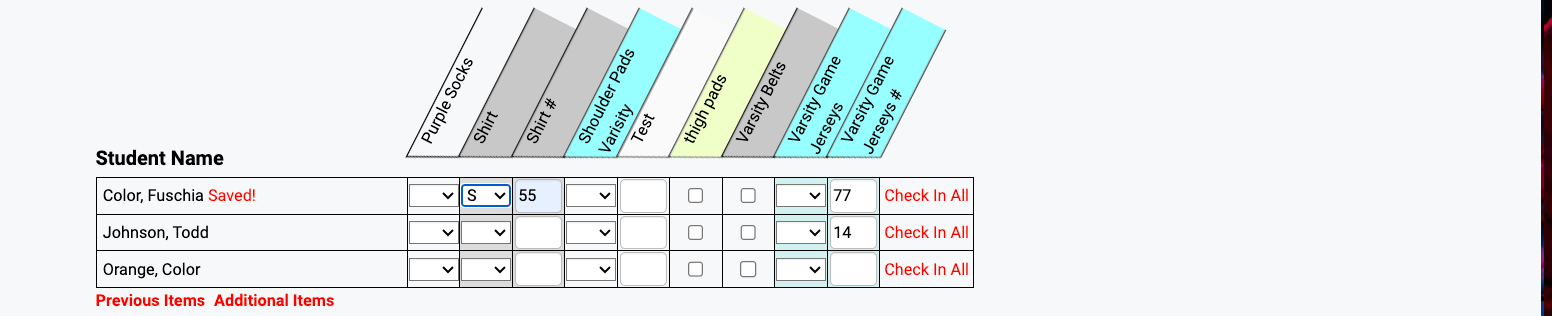
The "Saved!" message confirms the item was checked out with both size and ID
Step 1: Find the appropriate text box on the student row and item column you would like to check in. Click in the text box and completely delete the ID number that was previously entered. Hit the Tab key on your keyboard or click anywhere outside of that text box.

First, delete the ID number and press Tab
Step 2: Click on the drop-down in the appropriate space for the student and item being checked in. At the top of the drop-down will be a blank space. Click on the empty space.

Then, select the blank space in the size dropdown to complete check-in
At the end of every student's row, you will see a Check In All link. When this link is clicked, ALL items currently checked out to that student will be returned to inventory and removed from the student's profile. All information related to ID numbers and/or sizes will be cleared from the student's profile.
Each student has an Equipment tab within his or her profile. Items that are currently checked out to the student will be displayed here. Items can be checked in and removed from that student's profile within their Equipment Tab.
If the student has returned all equipment items, you can easily return the items to inventory and remove them from the student's profile by clicking Check In All under the appropriate sport.
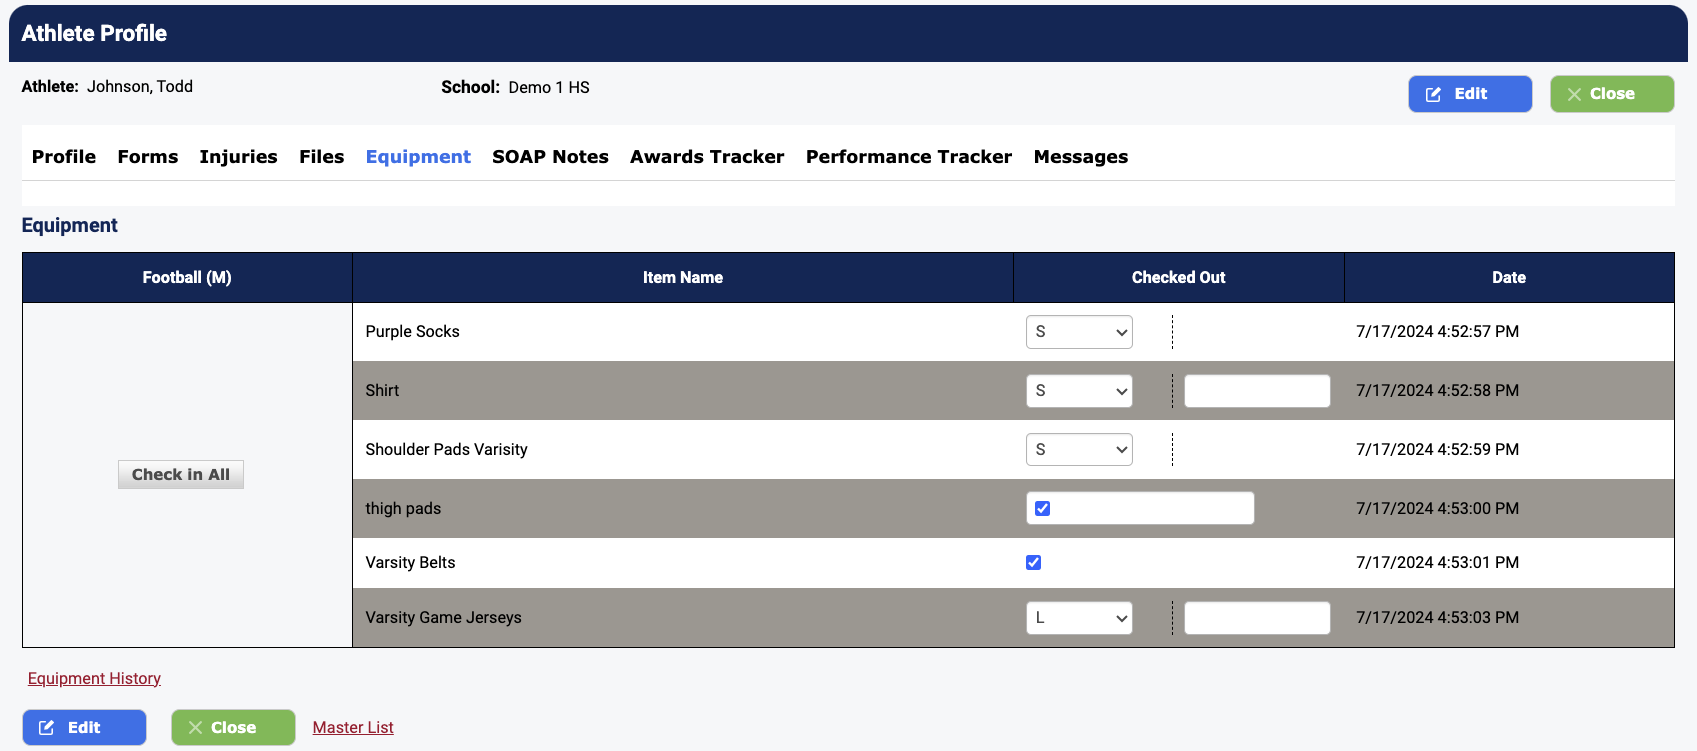
The Athlete Profile Equipment tab showing all items checked out to the student
When you do so, all items checked out from that sport will be returned to inventory and removed from the student's profile.
To check in individual items from the student profile, there are four potential scenarios:
| Scenario | Check In Method |
|---|---|
| Item does not have sizes or ID numbers | Click the checkbox to remove the check. Items are checked in. |
| Item is checked out using sizes only | Click the size drop down, select the blank space, click again. |
| Item is checked out using ID numbers only | Completely delete the ID number from the text box, click anywhere outside of the text box. |
| Item is checked out using ID numbers and Sizes | 1) Click the Size drop down, select the blank space, click again. 2) Completely delete the ID number from the text box, click anywhere outside of the text box. |